In this blog, we will explore the essential task of filling out receipt books, a foundational element of financial record-keeping for both small and large businesses. Documenting transactions in receipt books ensures accuracy in financial management, compliance with tax regulations, and the ability to resolve discrepancies with ease.
We will walk you through the basics of receipt books, including their structure and the information typically found on a receipt. Following that, we’ll provide practical steps with examples on how to fill out a receipt book correctly, ensuring that every transaction is documented comprehensively and professionally.
We will also delve into the benefits of automating your receipt books and how platforms like Nanonets can transform your approach to financial record-keeping.
Understanding Receipt Books
A receipt book is essentially a book of pre-printed forms designed to document transactions between a seller and a buyer. Each form within the book serves as a standalone record that outlines the details of a specific transaction, including the date, items or services purchased, amounts paid, and parties involved. The primary purpose of a receipt book is to act as a physical proof of purchase, which can be crucial for accounting, tax reporting, and resolving any discrepancies that might arise between the involved parties.
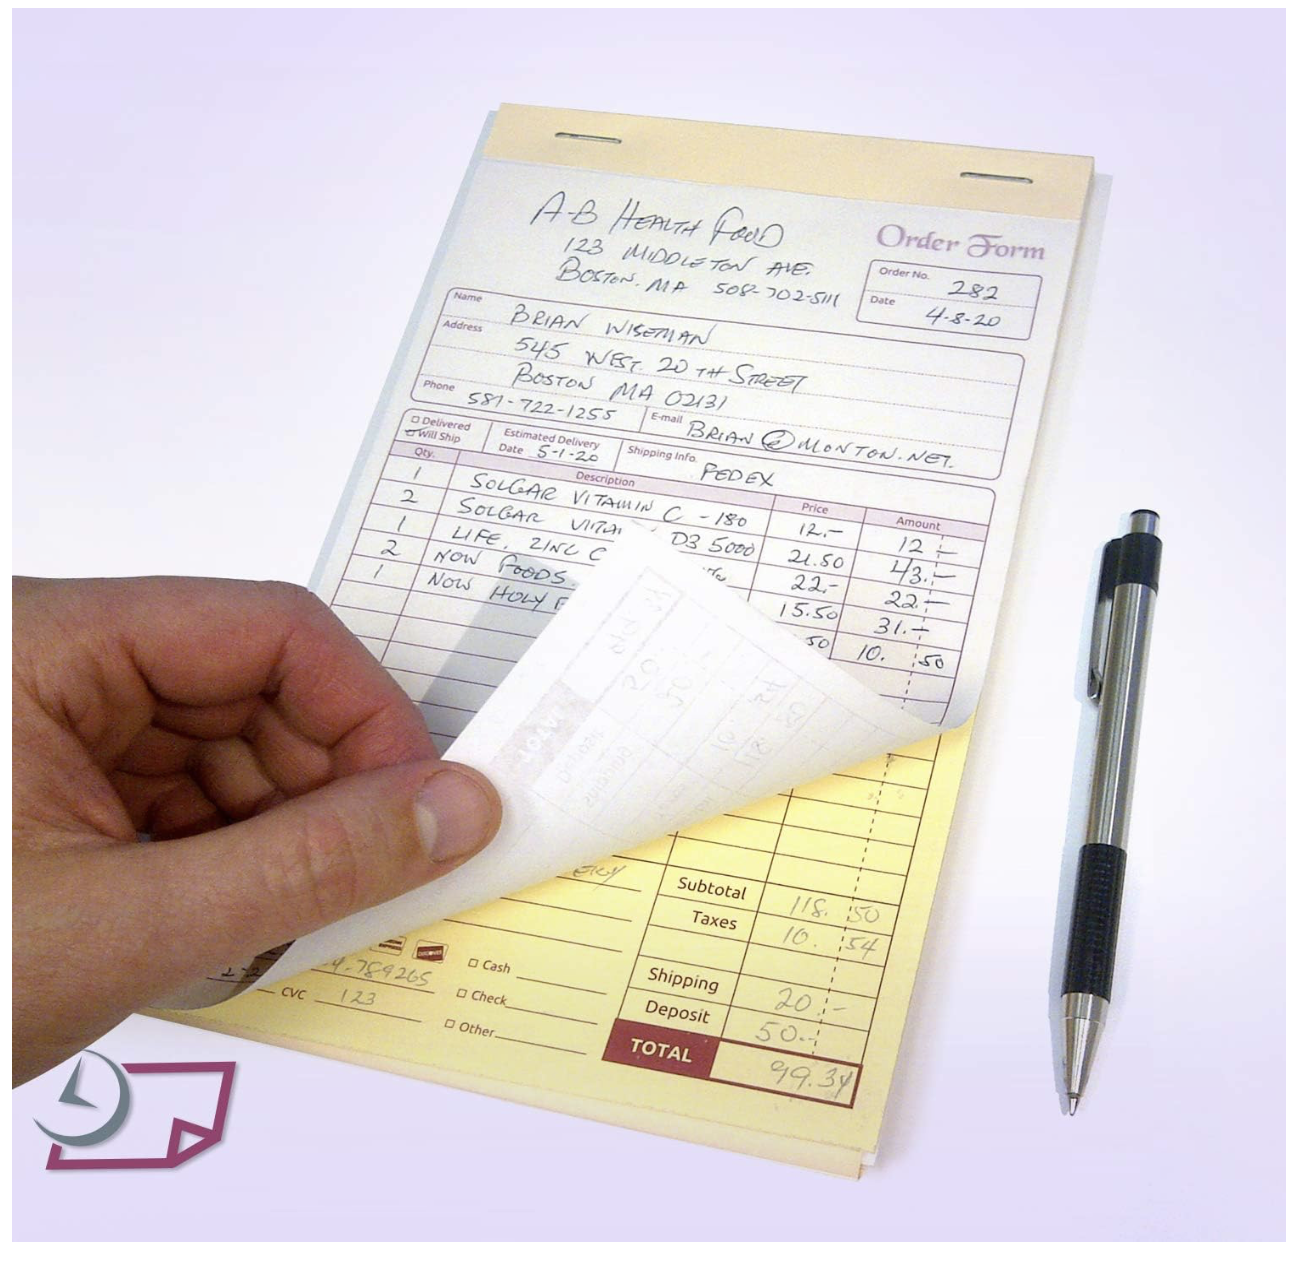
A well-crafted receipt serves as a proof of purchase and a record for both the buyer and seller. While digital platforms have added layers of complexity with features like QR codes and digital signatures, the core elements remain largely unchanged. Here’s what you should expect to find on each page in a receipt book:
Date of Transaction: Shows when the purchase was made. Important for keeping track of sales and for customers to know.
Receipt Number: Each sale gets a unique number. It’s key for referencing sales later, handling returns, or solving any issues.
Seller Information: This part lists the business’s name, how to contact them (address, phone, email), and sometimes who sold the item or service.
Buyer Information: Sometimes needed, especially for business sales. It can include the buyer’s name and contact details.
Description of Goods and Services Sold: A simple list showing each item or service sold, how many, and important details like size or color.
Prices of Goods and Services Sold: Next to each item or service, the price is shown. If needed, it also shows per hour or per item rates.
Subtotal: This appears below the table of Goods and Services sold, indicating only the cost of the items or services before adding any taxes or extra fees.
Taxes: Here, it shows all the tax applicable to the sale. Getting the tax right is a must.
Extra Fees: Lists any additional costs like delivery or service fees.
Total Amount: The full price the customer needs to pay, including everything.
Payment Method: Shows whether the customer paid with cash, card, check, online, or using any other payment method.
Return Policy: A quick note about returns or exchanges to help customers know what they can do if there’s a problem.
Signature Line: In some sales, especially big ones or services, there’s a place for a signature for added trust.
Accordingly, this is how a typical receipt book page looks like.
2024-02-19
#001234
XYZ Store
123 Business Ave, City, State
(123) 456-7890
| Name | Description | Quantity | Cost | Price |
|---|---|---|---|---|
| Product 1 | Product Description | 2 | $5.00 | $10.00 |
| Service 1 | Service Description | 1 | $40.00 | $40.00 |
$50.00
$4.00
$5.00
$59.00
Credit Card
Returns accepted within 30 days of purchase with receipt.
_____________________________
💡
Specialized Receipt Books: There are also receipt books tailored for specific types of transactions, such as rent payments or service sales, featuring pre-printed fields relevant to those activities.
Digital vs. Physical Receipt Books
The debate between digital and physical receipt books is not about superiority but suitability. Each type has its place, and the choice often depends on the specific needs, customer base, and operational setup of a business. The goal here is to make an informed choice that aligns with your business objectives and operational style.
| Aspect | Digital Receipt Books | Physical Receipt Books |
|---|---|---|
| Accessibility | Can be accessed from multiple devices anywhere, anytime. | Requires physical presence to access and review. |
| Storage | Unlimited storage without physical space constraints; cloud storage facilitates easy organization and retrieval. | Requires physical space for storage; risk of loss due to damage or misplacement. |
| Security | Enhanced security features, including encryption and backups, protect against loss and unauthorized access. | Susceptible to physical damage, theft, and loss. Limited options for secure backup. |
| Cost | Initial setup costs for software or platforms; ongoing costs may include cloud storage fees. | Costs associated with printing and purchasing books; no electronic infrastructure costs. |
| Environmental Impact | Reduces paper use, contributing to environmental sustainability. | Contributes to paper waste and environmental footprint. |
| Ease of Use | Requires familiarity with digital tools and platforms. Offers features like search and automatic calculations. | Intuitive and easy to use without the need for technological proficiency. |
| Customer Preference | Preferred by customers who value digital records and eco-friendly practices. | Favored in situations where a physical receipt is needed or preferred for record-keeping or reimbursements. |
| Compliance | Easier to manage, search, and compile for tax and compliance purposes. | Requires manual organization and can be time-consuming to compile for reporting purposes. |
In some cases, employing a hybrid approach—offering digital receipts for online transactions and physical receipts for in-person sales—might even be the best strategy. The key is to remain flexible and responsive to the changing preferences and needs of your customers and the evolving landscape of your industry.
Selection and Preparation
Before diving into the nuts and bolts of filling out receipt books, it’s crucial to select and prepare according to your business needs. Here are some criteria to consider to ensure your preparation best fits your business requirements:
The Significance of Permanent Ink: Opt for pens that utilize permanent ink to ensure that the information on your receipts remains free from the risks of being smudged or erased over time.
Choosing the Right Receipt Book: The nature of your transactions plays a pivotal role in selecting a suitable receipt book. Whether your dealings are generic or involve specific transactions such as rent payments or service charges, opting for a receipt book with custom fields tailored to your needs can streamline your process.
The Advantage of Duplicate/Triplicate Copies: Using a multi-copy receipt book means more than just giving customers their copy. The original receipt, typically white, goes to the customer, while the yellow one, a direct duplicate, is for the business’s records. This setup can extend up to four colors for complex operations, allowing for a structured distribution: white for the customer, yellow for sales, pink for finance, and blue as the master copy. This method not only streamlines record-keeping but also strengthens documentation, ensuring a comprehensive backup system for the business and its clients.
Incorporating Your Branding: Customizing your receipt book to reflect your brand’s identity—through logos, brand colors, and other visual elements reinforces your brand’s presence and professionalism in every transaction.
Pre-Printed Static Fields: Efficiency is key in business operations. By ensuring that static fields—such as seller information, return policies, and more—are pre-printed on your receipt book, you eliminate the need for repetitive manual input.
Portability for On-the-Go Transactions (If Required): The practicality of your receipt book’s design is paramount. A compact and durable receipt book offers convenience and reliability, ensuring you’re always prepared to conduct transactions, no matter where your business takes you.
Security Features (If Required): Opting for receipt books equipped with watermarks or unique numbering systems can be security measures that prove instrumental in deterring fraud and instilling confidence among your clients, safeguarding the integrity of your transactions.
Taking the time to select and customize the right receipt book for your business is an investment in your operational efficiency and your brand’s image.
Steps to Fill Out Receipt Book
Navigating through the process of filling out a receipt book meticulously ensures that each transaction is recorded accurately and professionally. This not only aids in financial management but also builds trust with your customers.
Imagine you’re a small business owner, Sarah, who runs a local coffee shop. A regular customer, John, comes in to purchase coffee beans and a coffee mug. Let’s navigate how Sarah fills out a receipt book page for this transaction.
Step 1: Date and Receipt Number
Always write the date in a consistent format (e.g., MM/DD/YYYY) at the top of the receipt. For the receipt number, consider a sequential system that starts at a specific number and increments with each receipt. This system helps in maintaining order and simplifying record-keeping.
- Scenario: It’s February 19, 2024, and this is the first transaction of the day.
- Action: At the top of the receipt, Sarah writes the date as “02/19/2024”. She checks the last receipt number, which was #1050, so she assigns “1051” as the new receipt number and writes it next to the date.
Step 2: Contact Details
Including the contact details of both the seller (your business) and the buyer (your customer) establishes a formal record of the transaction. It enhances credibility and provides essential information should there be a need for future communication.
- Scenario: The coffee shop’s details are pre-printed on the receipt book. John, the customer, is a regular, but for larger purchases, Sarah likes to record customer details.
- Action: Since John agrees, Sarah writes down his name, “John Doe”, and his phone number below the coffee shop’s pre-printed details, leaving a space for privacy.
Step 3: Product or Service Description
A detailed description of the product or service sold is necessary for clarity and record-keeping. It helps in resolving disputes, managing inventory, and understanding sales trends. List each product or service, including relevant details such as quantity, size, color, or SKU (Stock Keeping Unit) if applicable. Be as specific as possible to avoid ambiguity. For services, a brief description of the work performed can be included.
- Scenario: John purchases 2 bags of coffee beans and 2 ceramic coffee mugs.
- Action: Sarah writes down the items purchased by John:
- “Coffee Beans – Ethiopian Blend, 1lb” x2
- “Ceramic Coffee Mug – Blue” x2
Step 4: Pricing Details
Accurately listing the price per item and calculating the total cost are fundamental for both the buyer and seller. It ensures transparency and trust in the transaction. Next to each item or service listed, write down the price. If multiple quantities of the same item are sold, multiply the price by the quantity and write the total. If discounts apply, list them clearly and subtract from the total cost of items.
- Scenario: The coffee beans are $15 each, and the mugs are $10 each. There’s a promotion where buying two coffee beans bags gets a $5 discount, and each mug comes with a $2 discount when bought together with coffee beans.
- Action: Sarah lists the original prices, then applies the discounts as follows:
- Coffee Beans: $15 x 2 = $30
- Discount on Coffee Beans: -$5
- Ceramic Coffee Mugs: $10 x 2 = $20
- Discount on Mugs (for buying with coffee): -$4 ($2 per mug)
Step 5: Subtotals, Taxes, and Totals
Before the final total, it’s essential to calculate the subtotal (total before taxes and additional charges). Then, apply any taxes and add additional charges like shipping or handling fees to determine the grand total.
Sum the cost of all items for the subtotal. Calculate the tax based on your local tax rate and add it to the subtotal along with any other additional charges. The sum of these figures is the grand total, which is the amount the customer owes.
- Scenario: After applying discounts, the subtotal before tax needs to be calculated. The local sales tax rate is 8%.
- Action: Sarah calculates the subtotal by adding the discounted prices:
- Subtotal for Coffee Beans: $30 – $5 = $25
- Subtotal for Mugs: $20 – $4 = $16
- Combined Subtotal: $25 (Coffee Beans) + $16 (Mugs) = $41
Sarah then calculates the sales tax on the subtotal: $41 x 0.08 = $3.28. The grand total, including tax, is calculated: - Grand Total = $41 (Subtotal) + $3.28 (Tax) = $44.28
Step 6: Finalizing the Receipt
Reviewing the receipt for accuracy ensures that all details are correct and the transaction is recorded properly. Signing the receipt validates it, and deciding which copy is given to the customer and which is retained for records is crucial for documentation.
- Scenario: Sarah needs to finalize the transaction by reviewing the receipt for accuracy, signing it, and providing John with his copy.
- Action: Sarah reviews the receipt for accuracy, noting the original prices, discounts applied, and the final totals with tax. Satisfied, she signs at the bottom of the receipt. She then tears the top copy (the original) along the perforated line and hands it to John. The duplicate copy remains attached in the book for Sarah’s records.
The receipt would look something like this.
Name: John Doe
Phone: [John’s Phone Number]
Items Purchased
| Description | Quantity | Unit Price | Total |
|---|---|---|---|
| Coffee Beans – Ethiopian Blend, 1lb | 2 | $15 | $30 |
| Ceramic Coffee Mug – Blue | 2 | $10 | $20 |
| Discount (If Any): | -$9 | ||
| Subtotal: | $41 | ||
| Sales Tax (8%): | $3.28 | ||
| Grand Total: | $44.28 | ||
By following these steps meticulously, you create a reliable and professional record of each transaction. This not only aids in effective financial management but also enhances the overall customer experience, reinforcing the trust and credibility of your business.
Steps to Fill Out Rent Receipt Book
Navigating through the meticulous process of filling out a rent receipt book is crucial for landlords and property managers. It ensures that every rent payment is documented accurately and professionally, fostering trust between the landlord and the tenant. Consider a scenario where you, Alex, are a landlord collecting monthly rent from your tenant, Jordan. Let’s explore how Alex fills out a rent receipt book for this transaction.
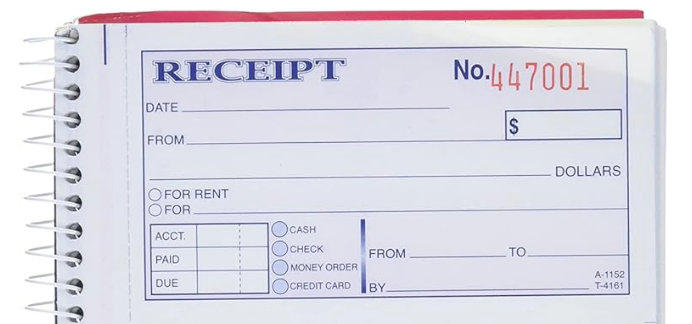
Completing a rent receipt book with attention to detail is paramount for landlords and property managers. It provides a clear paper trail for financial transactions and reassures tenants that their payments are documented. Here’s how you, as a landlord named Alex, would fill out a rent receipt for your tenant, Jamie.
Step 1: Date and Receipt Number
Begin by writing the date in a standard format, such as MM/DD/YYYY, to avoid any confusion. The receipt number should follow a sequential pattern, which assists in organizing your records efficiently.
Scenario: Today’s date is February 19, 2024, and the previous receipt number was 447000.
Action: Alex enters the date as “02/19/2024” on the designated line and writes “447001” as the next sequential receipt number.
Step 2: From and To
Clearly state the name of the tenant making the payment and the recipient of the payment, usually the landlord or property management company.
Scenario: Jamie is paying this month’s rent.
Action: Alex writes “Jamie Smith” in the “FROM” section and “Alex Johnson” in the “TO” section, establishing the parties involved in the transaction.
Step 3: Payment Details
Check the appropriate box to indicate that the payment is for rent. Specify the rental period by writing the start and end dates. If the payment is for something else, such as a security deposit, check the other box and write a description.
Scenario: The payment covers rent for the month of March 2024.
Action: Alex checks the “FOR RENT” box and writes “March 1, 2024, to March 31, 2024” in the lines provided.
Step 4: Amount
Enter the payment amount in both numbers and words to prevent any misinterpretation. This reduces errors and ensures both parties agree on the amount paid.
Scenario: The monthly rent is $1,200.
Action: Alex writes “$1,200” in the box and “One thousand two hundred dollars” on the line next to “DOLLARS.”
Step 5: Payment Method
Indicate the method of payment by checking the appropriate box – cash, check, money order, or credit card. If a check or money order is used, write down the number for reference.
Scenario: Jamie pays with a check.
Action: Alex checks the “CHECK” box and writes the check number in the “ACCT. NO.” section.
Step 6: Signatures and Balances
If there’s any outstanding balance, note it in the “DUE” section. Then, both the landlord and tenant should sign the receipt to acknowledge the payment. If providing a copy to the tenant, decide whether the original or a duplicate is appropriate for their records.
Scenario: Jamie’s rent is paid in full, with no outstanding balance.
Action: Alex writes “0” in the “DUE” section, signs the receipt, and hands the original to Jamie while keeping the duplicate for his records.
By following these steps meticulously, landlords and property managers can create a reliable and professional record of each rent transaction.
Managing your Receipt Book
Consistency and Clarity: One of the foundations of effective receipt book management is consistency. This means using the same format for dates, receipt numbers, and details across all entries. Consistency not only makes it easier to reference and organize receipts but also streamlines the process for reviewing and auditing financial records.
Secure Storage and Organization: In today’s digital age, backing up your physical records has never been more important. Keep your receipt books in a secure, dry place to protect them from damage. Regularly photocopying or scanning your filled-out receipt books provides a safety net against loss, damage, or wear. Digital backups should be stored securely, using encrypted storage solutions to protect sensitive information. Organize them chronologically or in a manner that suits your business operations, ensuring easy access when needed.
Embracing Automation: As your business expands, manual receipt management may become inefficient and prone to errors. Leveraging technology to automate your receipt book management can save time and reduce the likelihood of mistakes. Tools like Nanonets offer solutions for digitizing receipts, tracking expenses, and integrating financial records into accounting systems seamlessly. Automation not only streamlines processes but also frees up valuable time to focus on core business activities. We will discuss this in more detail in the oncoming section.
Automate your Receipt Books
Automating receipt books represents a significant leap forward in financial management, offering unparalleled efficiency, accuracy, and integration across various business systems. The transition from manual to automated processes not only streamlines operations but also provides a robust automated framework for recording and managing transactions, extending from the moment of purchase through to reconciliation in accounting or ERP systems through to the final ledger entry in your accounting or ERP system.
Let’s take a look at how Nanonets automates these processes.
Effortless Receipt Recording at Your Fingertips
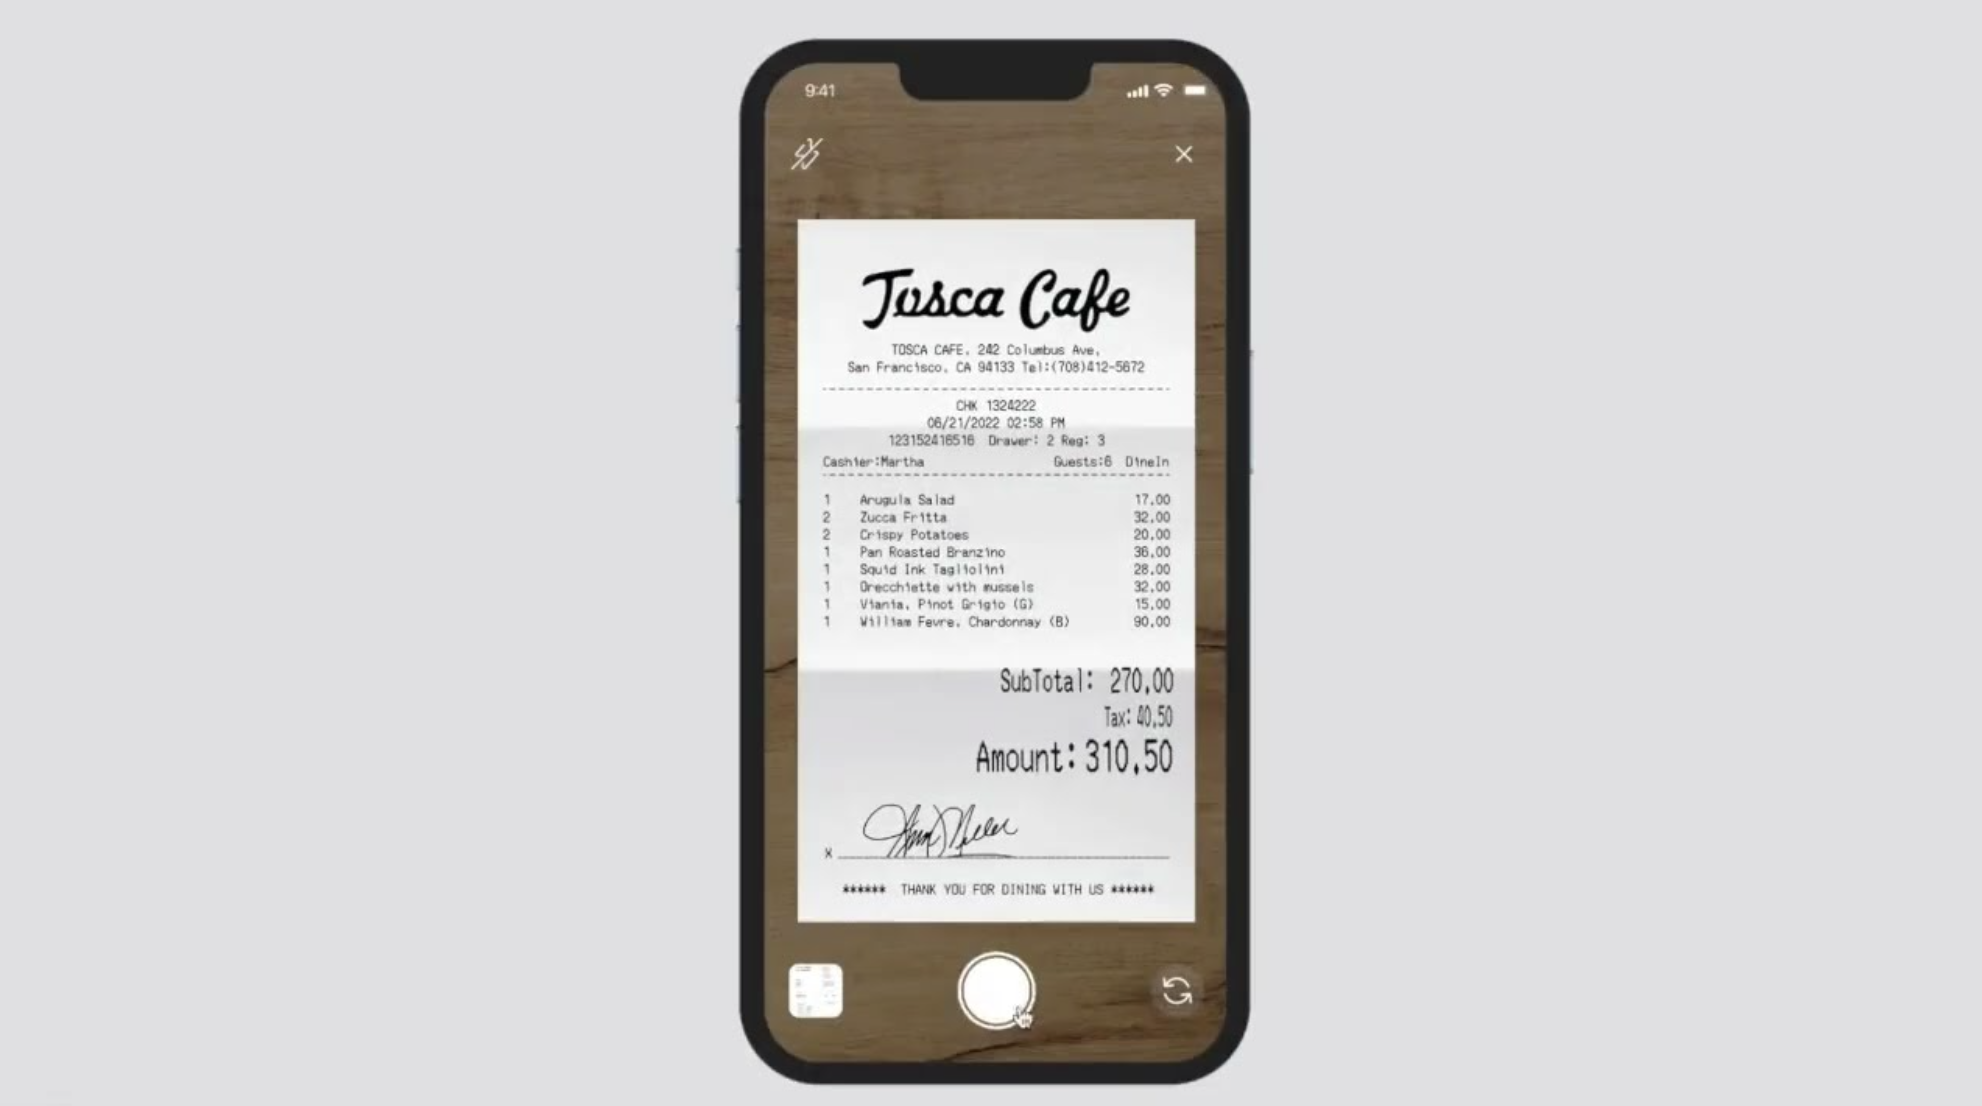
All handwritten and printed receipts can be easily scanned using a smartphone or directly uploaded into the Nanonets platform.
All digital receipts can either be created and printed directly using the Nanonets platform, or imported into Nanonets from your mail, apps and databases.
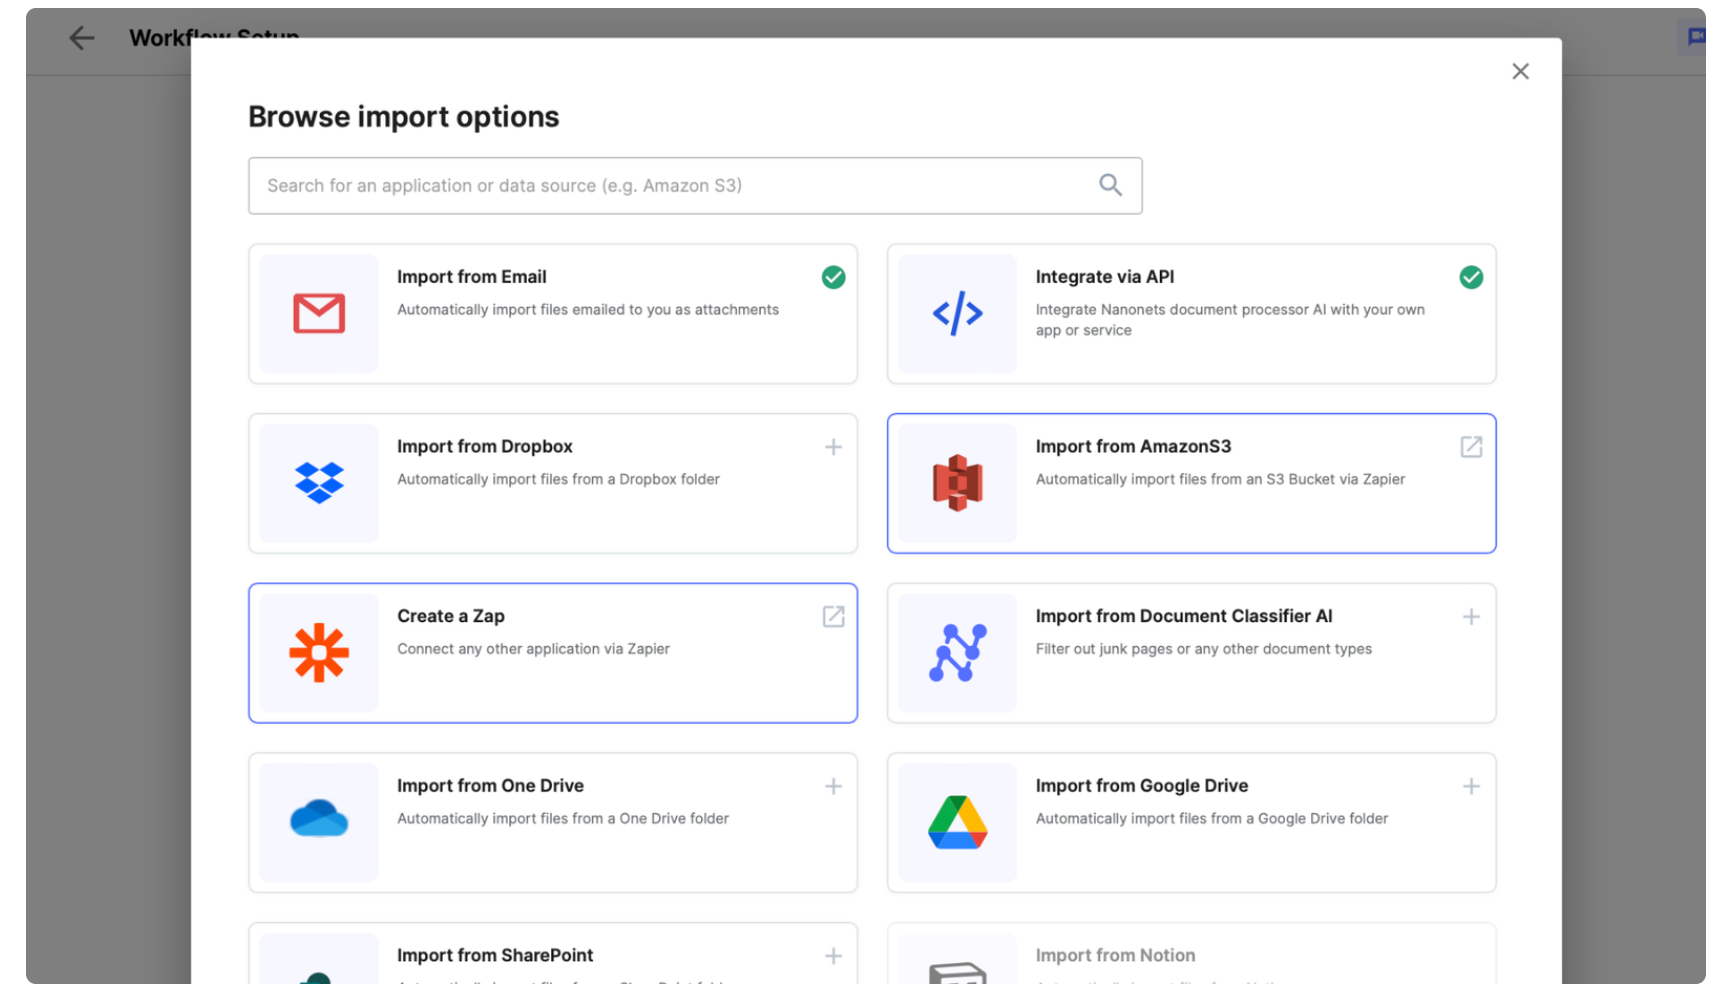
This process ensures that every piece of data, regardless of its origin, finds its place in a centralized, digital repository, ready for further action.
Unleashing the Power of OCR for Seamless Digitization
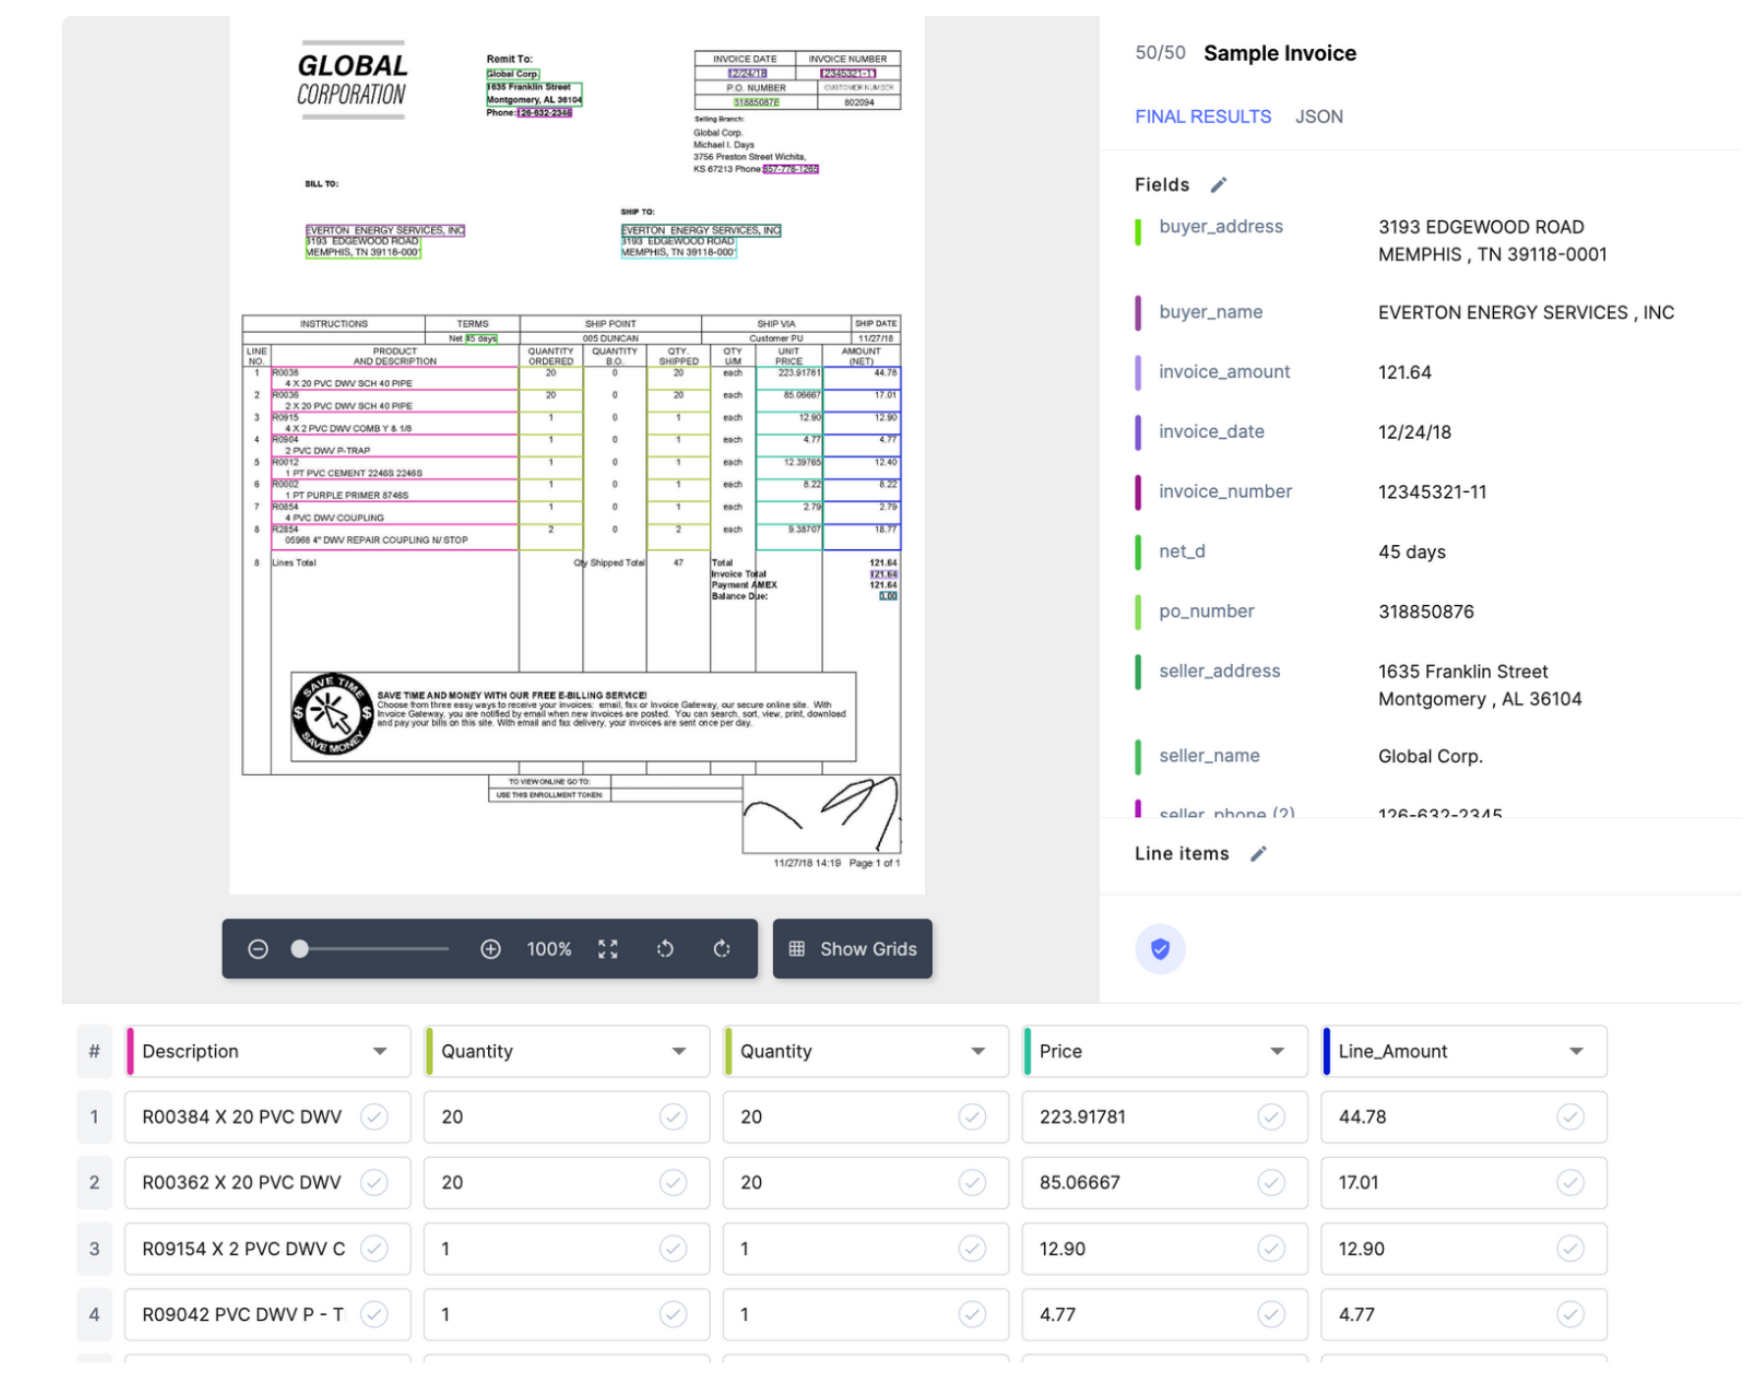
Nanonets doesn’t just read your receipts; it comprehends them. By extracting crucial data from every type of receipt and organizing it into a structured digital format, Nanonets eliminates the chaos from your financial records. This digitization process not only saves time but also ensures that every transaction is accurately captured and stored.
Intelligent Categorization and GL Coding
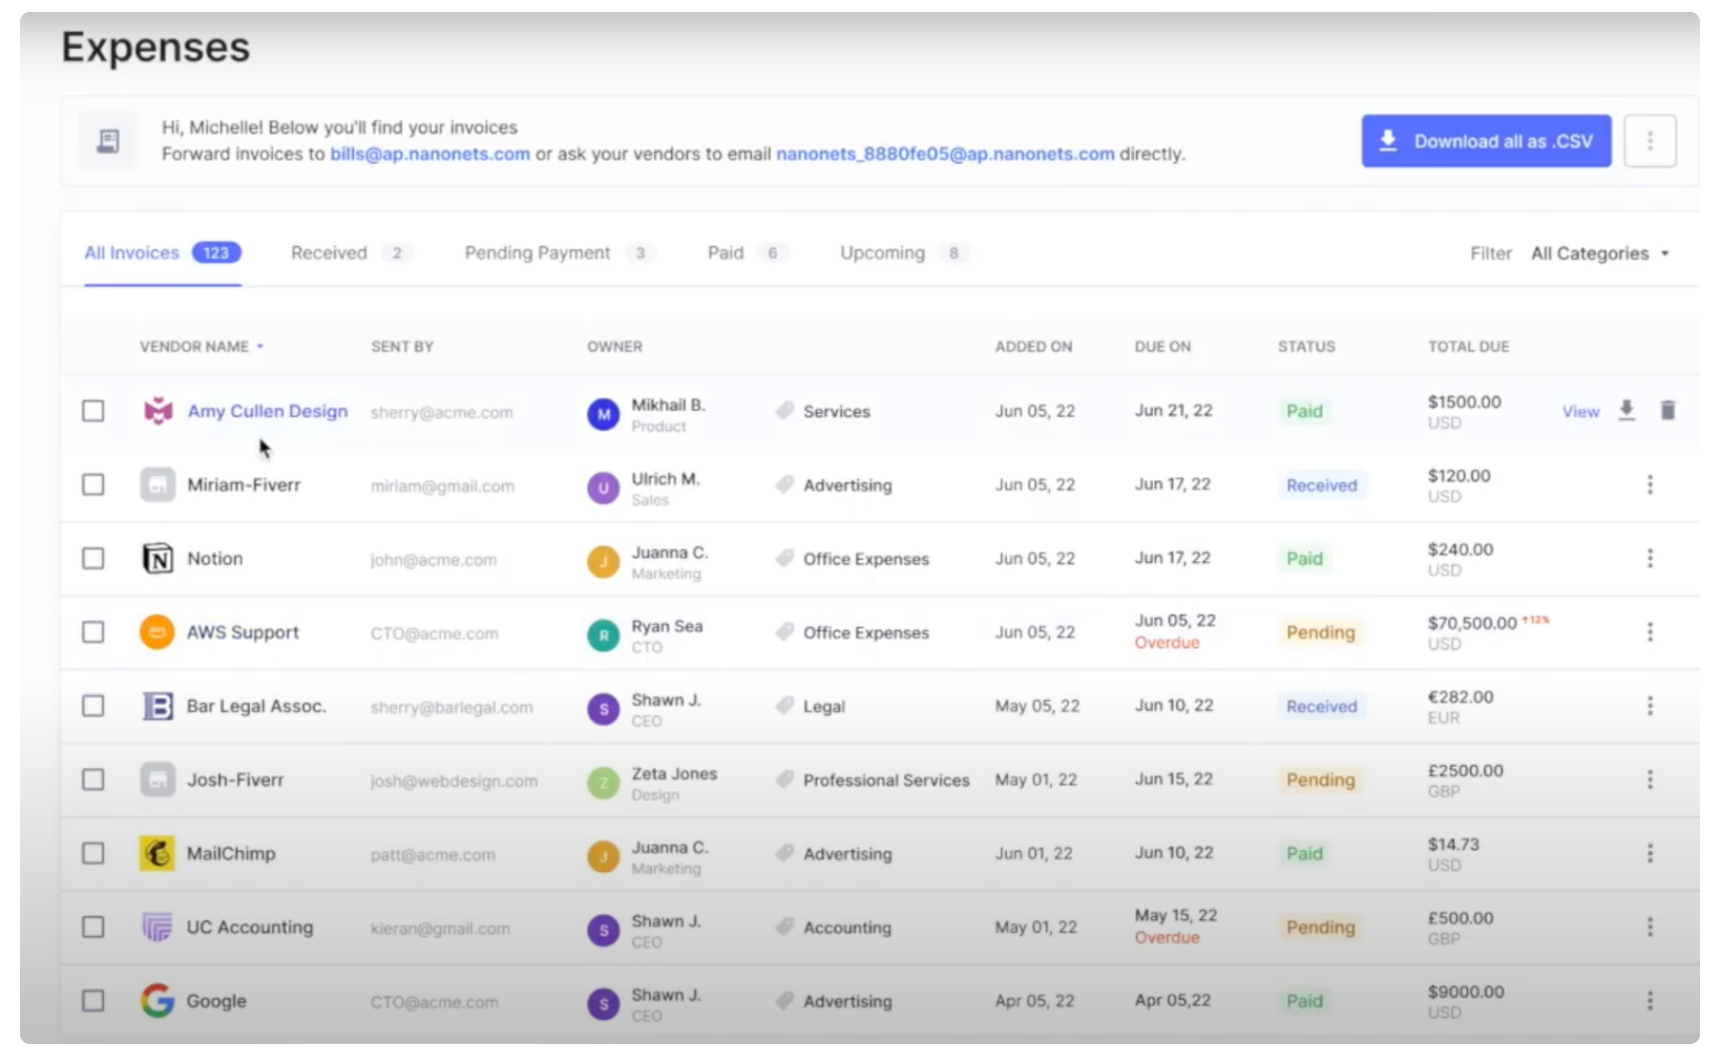
Nanonets goes beyond mere data collection. Utilizing AI, it delves into the context of your receipts, understanding the nuances of your financial transactions. Nanonets AI allows for automatic categorization according to your own framework and even assigns General Ledger (GL) codes, streamlining the process of financial reporting and analysis.
Enhanced Search Capabilities and Insightful Spend Analysis

With your receipts digitized and organized, Nanonets unlocks powerful search functionality. You can now sift through your financial data with ease, categorize receipts by GL codes, or other dimensions, and conduct detailed spend analysis. This comprehensive, real-time data gives you a clear view of your financial landscape, empowering you to make informed decisions.
Advanced Validation Checks
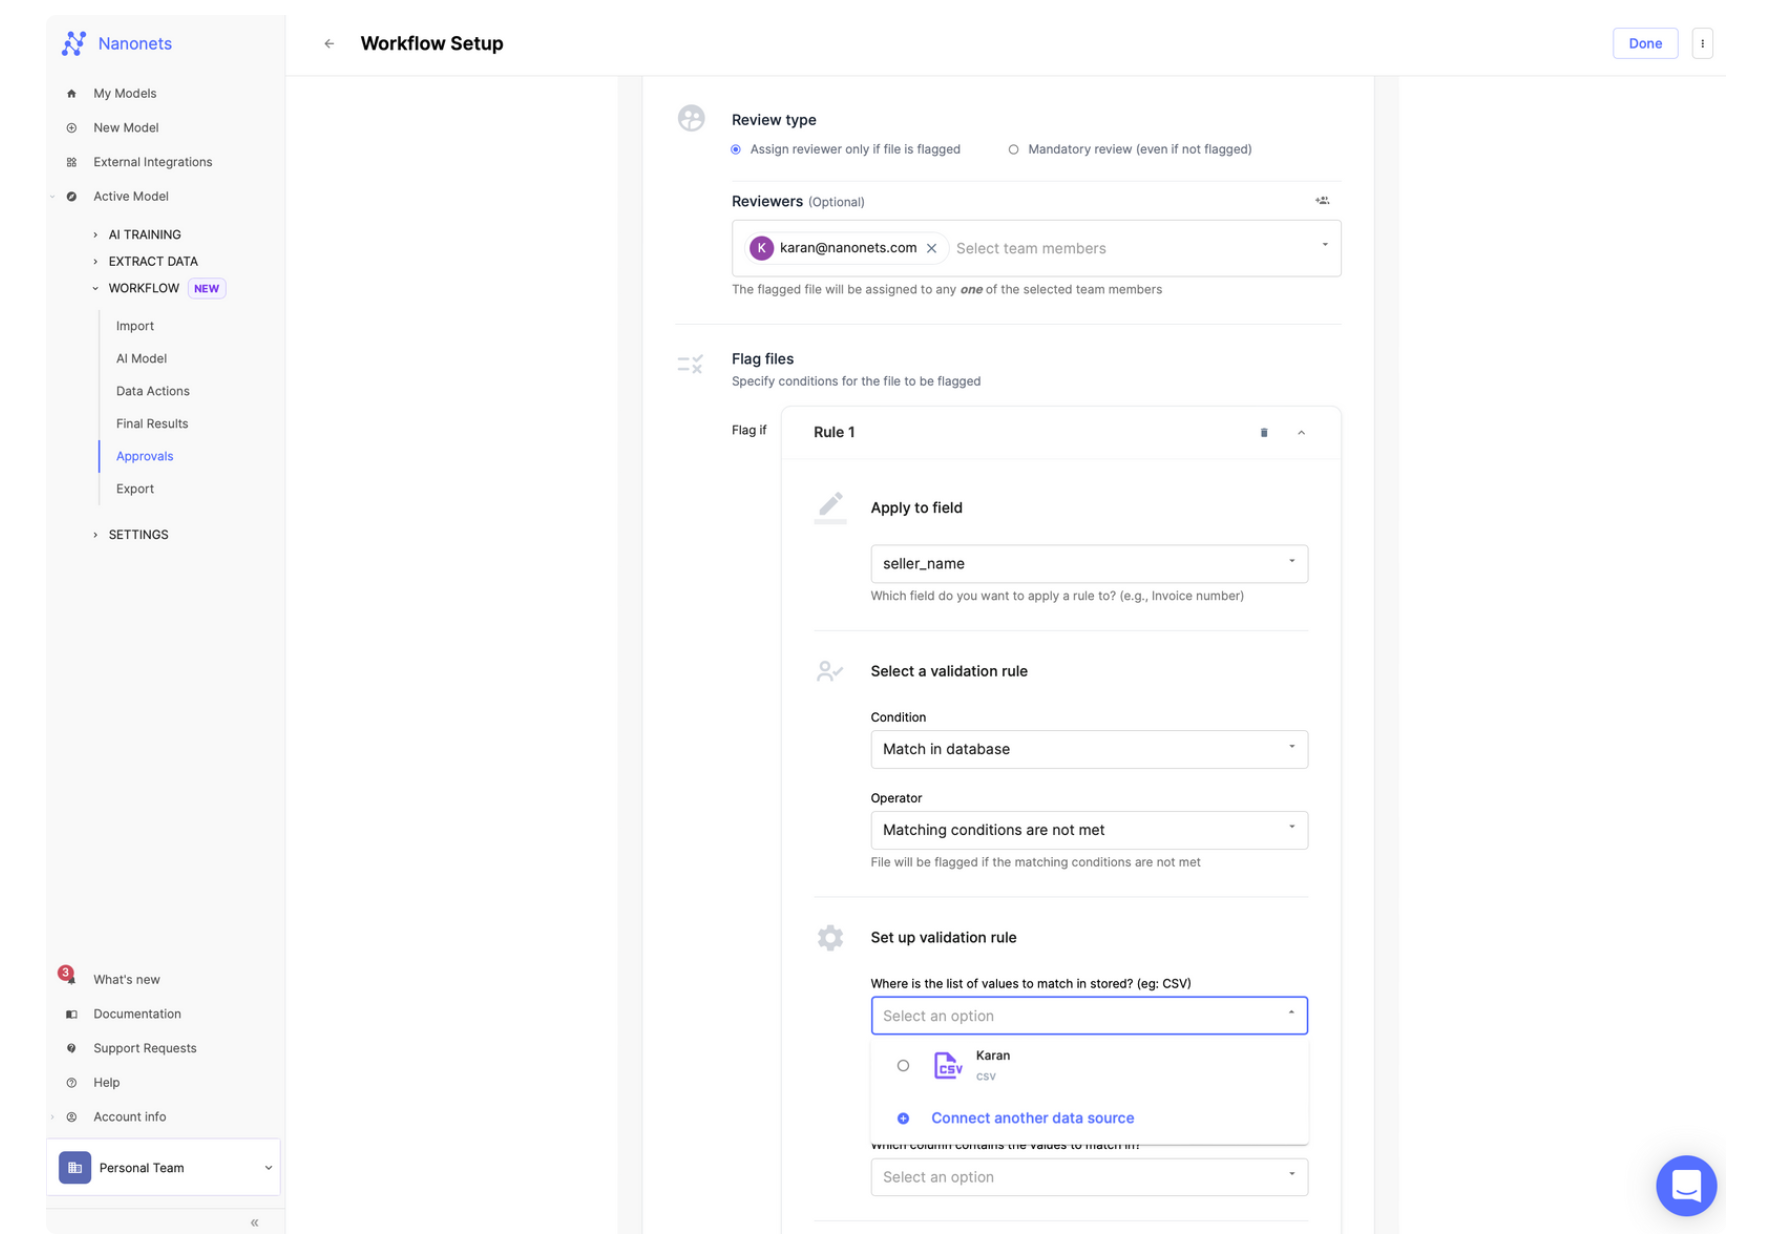
With Nanonets, you can configure pre-set validation rules to identify any discrepancies or anomalies within your transactions, flagging issues for review before they become problematic.
Seamless ERP Integration

Nanonets offers seamless, real-time data synchronization with your accounting software / ERP system / other apps. This real-time data sync is a game-changer, eliminating the need for manual data entry and ensuring that your financial records are always up-to-date. We offer seamless integration with 100s of tools, including Gmail, Quickbooks, Xero, & Stripe.
Automated Financial Reconciliation
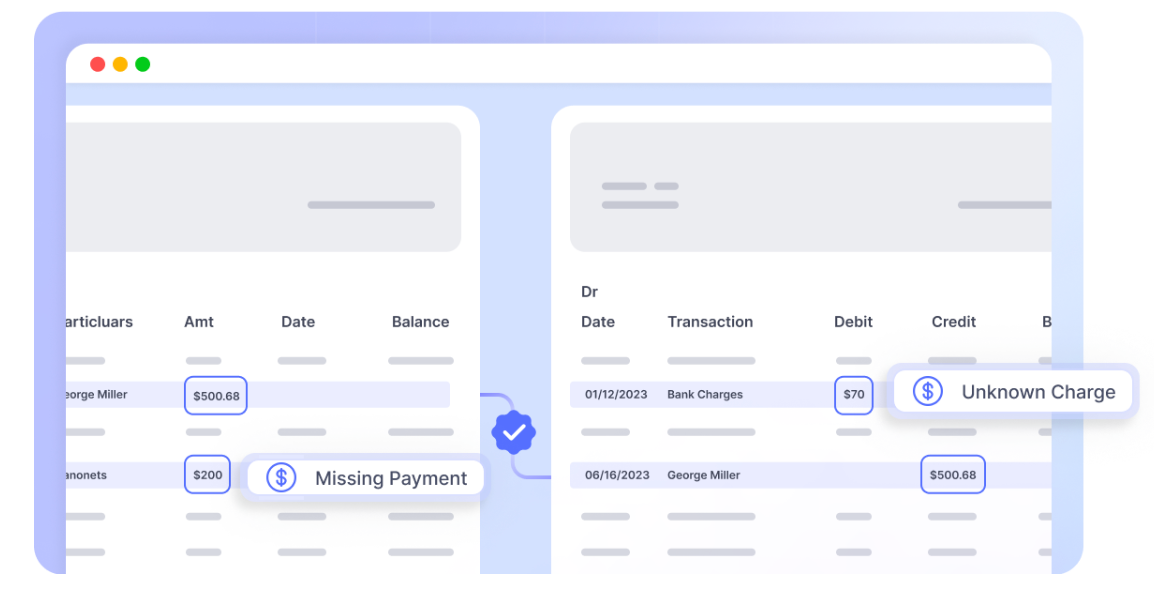
By syncing bank statements and ERP data in a few clicks, Nanonets facilitates a reconciliation process that is not only automated but also up to 90% faster. This means closing your month-end books becomes a breeze, freeing up valuable time and resources.
In essence, Nanonets offers a multi-faceted approach for automating receipt books which ensures efficiency, accuracy, and integration, paving the way for a more streamlined, insightful, and proactive financial strategy.
Ready to automate filling out and managing your receipt books? Embrace the future of transaction documentation. Explore Nanonets and discover how automation can transform your receipt documentation and management process today.
- SEO Powered Content & PR Distribution. Get Amplified Today.
- PlatoData.Network Vertical Generative Ai. Empower Yourself. Access Here.
- PlatoAiStream. Web3 Intelligence. Knowledge Amplified. Access Here.
- PlatoESG. Carbon, CleanTech, Energy, Environment, Solar, Waste Management. Access Here.
- PlatoHealth. Biotech and Clinical Trials Intelligence. Access Here.
- Source: https://nanonets.com/blog/how-to-fill-out-a-receipt-book/
- :has
- :is
- :not
- :where
- $3
- $UP
- 08
- 1
- 10
- 12
- 16
- 19
- 200
- 2024
- 22
- 28
- 30
- 31
- 32
- 7
- 9
- a
- ability
- About
- accepted
- access
- accessed
- According
- Accounting
- accuracy
- accurately
- acknowledge
- across
- Act
- Action
- activities
- add
- added
- adding
- Additional
- address
- ADvantage
- After
- against
- age
- agrees
- AI
- aids
- alex
- Aligns
- All
- Allowing
- allows
- along
- also
- always
- Amazon
- Ambiguity
- among
- amount
- amounts
- an
- analysis
- and
- anomalies
- any
- anywhere
- appears
- applicable
- applied
- applies
- Apply
- Applying
- approach
- appropriate
- apps
- ARE
- arise
- AS
- assists
- associated
- At
- attention
- auditing
- automate
- Automated
- automates
- Automatic
- automating
- Automation
- ave
- avoid
- backing
- Backup
- backups
- bags
- Balance
- Bank
- base
- based
- Basics
- BE
- become
- becomes
- been
- before
- being
- below
- benefits
- BEST
- between
- Beyond
- Big
- Blend
- Blog
- Blue
- book
- Books
- both
- both parties
- Bottom
- bought
- Box
- brand
- breeze
- builds
- business
- businesses
- but
- BUYER..
- Buying
- by
- calculate
- calculated
- calculates
- calculating
- calculations
- CAN
- capabilities
- captured
- card
- cases
- Cash
- categorize
- centralized
- changing
- Chaos
- charges
- check
- checking
- Checks
- choice
- City
- clarity
- clear
- clearly
- clients
- closing
- Cloud
- cloud storage
- codes
- Coffee
- coffee shop
- Collecting
- collection
- color
- comes
- Communication
- compact
- company
- complex
- complexity
- compliance
- comprehends
- comprehensive
- Conduct
- confidence
- confusion
- Consider
- consistent
- constraints
- contact
- context
- contributing
- convenience
- Core
- correct
- correctly
- Cost
- Costs
- Covers
- create
- created
- Credibility
- credit
- credit card
- criteria
- crucial
- custom
- customer
- customer details
- customer experience
- Customers
- customize
- damage
- data
- data entry
- databases
- Date
- Dates
- day
- Days
- debate
- decide
- Deciding
- decisions
- delivery
- delve
- delves
- depends
- deposit
- description
- Design
- designated
- designed
- detail
- detailed
- details
- Determine
- Devices
- digital
- digital age
- digitization
- digitized
- digitizing
- dimensions
- direct
- directly
- Discount
- discounted
- discounts
- discover
- discuss
- disputes
- distribution
- diving
- do
- document
- documentation
- doe
- doesn
- dollars
- down
- dry
- due
- e
- each
- ease
- easier
- easily
- easy
- Eco-friendly
- Effective
- efficiency
- efficiently
- either
- Electronic
- element
- elements
- eliminate
- eliminates
- eliminating
- else
- embrace
- employing
- empowering
- encrypted
- encryption
- end
- Enhances
- ensure
- ensures
- ensuring
- Enters
- entry
- environmental
- Environmental Sustainability
- equipped
- ERP
- Errors
- especially
- essence
- essential
- essentially
- establishes
- establishing
- Even
- Every
- everything
- evolving
- examples
- Exchanges
- expands
- expect
- expenses
- experience
- explore
- extend
- extending
- extra
- facilitates
- Familiarity
- faster
- Features
- Featuring
- February
- Fees
- few
- field
- Fields
- Figures
- fill
- filling
- fills
- final
- finalize
- finance
- financial
- financial data
- financial strategy
- Find
- finds
- First
- fits
- flexible
- Focus
- follow
- following
- follows
- Footprint
- For
- form
- formal
- format
- forms
- Forward
- fostering
- found
- foundational
- Foundations
- four
- Framework
- fraud
- Free
- freeing
- from
- full
- functionality
- fundamental
- further
- future
- game-changer
- General
- gets
- getting
- given
- gives
- Giving
- goal
- Goes
- goods
- grand
- Handling
- Hands
- Have
- help
- helps
- here
- his
- hour
- How
- How To
- HTTPS
- hundred
- Hybrid
- identify
- if
- image
- important
- in
- in-person
- include
- included
- Including
- indicate
- indicating
- industry
- inefficient
- information
- informed
- Infrastructure
- input
- insightful
- instrumental
- Integrating
- integration
- integrity
- into
- inventory
- investment
- involve
- involved
- issues
- IT
- items
- ITS
- Jamie
- John
- JOHN DOE
- Johnson
- Jordan
- just
- Keep
- keeping
- Key
- Know
- landlord
- landscape
- large
- largely
- larger
- Last
- later
- layers
- Leap
- leaving
- Ledger
- let
- leveraging
- like
- likelihood
- likes
- Limited
- Line
- lines
- List
- Listed
- listing
- Lists
- ll
- local
- Look
- LOOKS
- loss
- made
- Maintaining
- make
- MAKES
- Making
- manage
- management
- Managers
- managing
- manner
- manual
- many
- March
- March 1
- March 2024
- master
- Matter
- May..
- means
- measures
- mere
- method
- meticulous
- meticulously
- might
- mistakes
- moment
- money
- Month
- monthly
- more
- multiple
- must
- name
- Named
- Nature
- Navigate
- necessary
- Need
- needed
- needs
- net
- never
- New
- next
- no
- note
- noting
- now
- nuances
- number
- numbers
- objectives
- OCR
- of
- offer
- offering
- Offers
- often
- on
- ONE
- ones
- ongoing
- online
- only
- operational
- Operations
- Options
- or
- order
- organization
- Organized
- organizing
- origin
- original
- Other
- out
- outlines
- outstanding
- over
- overall
- own
- owner
- page
- paid
- Paper
- Paramount
- part
- parties
- Pattern
- Paving
- Pay
- paying
- payment
- payment method
- payments
- pays
- per
- performed
- period
- permanent
- phone
- physical
- piece
- pink
- pivotal
- Place
- platform
- Platforms
- plato
- Plato Data Intelligence
- PlatoData
- plays
- policies
- policy
- possible
- power
- powerful
- Practical
- practices
- preferences
- preferred
- preparation
- Prepare
- prepared
- presence
- prevent
- previous
- price
- Prices
- pricing
- primary
- printing
- privacy
- Proactive
- Problem
- problematic
- process
- processes
- Product
- professional
- professionalism
- professionally
- promotion
- proof
- properly
- property
- protect
- Prove
- provide
- provided
- provides
- providing
- purchase
- purchased
- purchases
- purchasing
- purpose
- purposes
- qr-codes
- quantity
- Quick
- Quickbooks
- Rate
- Rates
- RE
- Read
- ready
- real-time
- real-time data
- reassures
- receipts
- reconciliation
- record
- record-keeping
- recorded
- recording
- records
- reduce
- reduces
- reference
- referencing
- reflect
- Regardless
- regular
- regularly
- regulations
- reinforces
- relevant
- reliability
- reliable
- remain
- remains
- Rent
- repetitive
- Reporting
- repository
- represents
- required
- Requirements
- resolve
- resolving
- Resources
- responsive
- retrieval
- return
- returns
- review
- reviewing
- Reviews
- right
- Risk
- risks
- robust
- Role
- rules
- runs
- s
- safeguarding
- Safety
- sale
- sales
- same
- satisfied
- Save
- scanning
- scenario
- seamless
- seamlessly
- Search
- Section
- secure
- securely
- security
- Security Measures
- select
- selecting
- sensitive
- serves
- service
- Services
- setup
- she
- Shipping
- Shop
- should
- showing
- shown
- Shows
- Sift
- sign
- signature
- Signatures
- significance
- significant
- signing
- Signs
- Simple
- simplifying
- since
- situations
- Size
- small
- small business
- smartphone
- smith
- So
- Software
- sold
- Solutions
- Solving
- some
- something
- sometimes
- Space
- specific
- spend
- standalone
- standard
- start
- starts
- State
- statements
- static
- Steps
- stock
- storage
- stored
- Strategy
- streamline
- streamlined
- streamlines
- streamlining
- Strengthens
- stripe
- structure
- structured
- style
- such
- suitability
- suitable
- Sustainability
- sync.
- synchronization
- system
- Systems
- table
- tailored
- Take
- takes
- Task
- tax
- Taxes
- technological
- Technology
- tenant
- than
- that
- The
- The Basics
- The Future
- the information
- The LINE
- theft
- their
- Them
- then
- There.
- These
- they
- this
- those
- thousand
- Through
- time
- time-consuming
- to
- today
- today’s
- together
- tools
- top
- Total
- track
- Tracking
- trail
- transaction
- Transactions
- Transform
- transition
- Transparency
- Trends
- Trust
- two
- type
- types
- typical
- typically
- unauthorized
- understanding
- unique
- unit
- unlocks
- unparalleled
- up-to-date
- uploaded
- use
- used
- using
- usually
- utilize
- Utilizing
- validation
- Valuable
- value
- various
- View
- visual
- vs
- walk
- was
- Waste
- watermarks
- Way..
- we
- wear
- What
- when
- whether
- which
- while
- white
- WHO
- will
- with
- within
- without
- words
- Work
- would
- write
- writing
- X
- xero
- You
- Your
- zephyrnet


