随着在线社交平台的发展和普及,人们可以通过即时消息等工具比以往任何时候都更加紧密地联系在一起。 然而,这引起了对有毒言论以及网络欺凌、言语骚扰或羞辱的额外关注。 内容审核对于促进健康的在线讨论和创建健康的在线环境至关重要。 为了检测有毒语言内容,研究人员一直在开发基于深度学习的自然语言处理 (NLP) 方法。 最近的方法采用基于 transformer 的预训练语言模型,并实现了高毒性检测精度。
在现实世界的毒性检测应用中,毒性过滤主要用于游戏平台等与安全相关的行业,在这些行业中,模型不断受到社会工程和对抗性攻击的挑战。 因此,直接部署基于文本的 NLP 毒性检测模型可能会出现问题,需要采取预防措施。
研究表明,深度神经网络模型在面对对抗样本时无法做出准确的预测。 人们对研究 NLP 模型的对抗鲁棒性越来越感兴趣。 这是通过一系列新开发的对抗性攻击来完成的,这些攻击旨在愚弄机器翻译、问答和文本分类系统。
在这篇文章中,我们使用 Hugging Face 训练了一个基于 transformer 的毒性语言分类器,在对抗样本上测试训练模型,然后进行对抗训练并分析其对训练的毒性分类器的影响。
解决方案概述
对抗性示例是有意扰乱输入,旨在将机器学习 (ML) 模型误导为不正确的输出。 在以下示例中(来源: https://aclanthology.org/2020.emnlp-demos.16.pdf),通过将“Perfect”一词改为“Spotless”,NLP 模型给出了完全相反的预测。
社会工程师可以利用 NLP 模型的这种特性来绕过毒性过滤系统。 为了使基于文本的毒性预测模型更能抵抗蓄意的对抗性攻击,文献开发了多种方法。 在这篇文章中,我们展示了其中之一——对抗训练,以及它如何提高文本毒性预测模型的对抗鲁棒性。
对抗训练
成功的对抗样本揭示了目标受害者 ML 模型的弱点,因为该模型无法准确预测这些对抗样本的标签。 通过结合原始训练数据和成功的对抗性示例对模型进行再训练,再训练后的模型将对未来的攻击更加稳健。 这个过程称为 对抗训练.
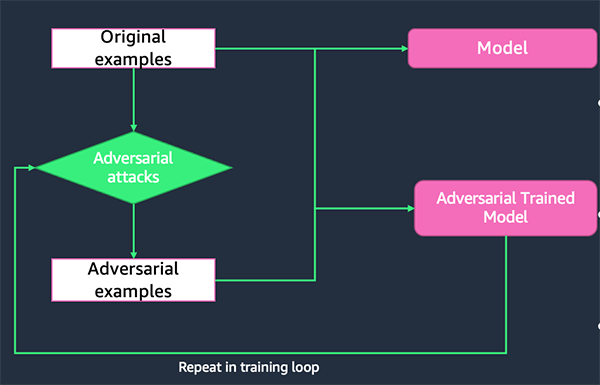
TextAttack Python 库
TextAttack 是一个 Python 库,用于生成对抗性示例并执行对抗性训练以提高 NLP 模型的稳健性。 该库提供了文献中多种最先进的文本对抗性攻击的实现,并支持各种模型和数据集。 其代码和教程可在 GitHub上.
数据集
恶意评论分类挑战 Kaggle 上提供了大量维基百科评论,这些评论已被人类评分者标记为有毒行为。 毒性类型有:
在这篇文章中,我们只预测 toxic 柱子。 训练集包含 159,571 个实例,其中 144,277 个无毒示例和 15,294 个有毒示例,测试集包含 63,978 个实例,其中 57,888 个无毒示例和 6,090 个有毒示例。 我们将测试集分为验证集和测试集,其中包含 31,989 个实例,每个实例包含 29,028 个无毒实例和 2,961 个有毒实例。 以下图表说明了我们的数据分布。
出于演示目的,本文随机抽取 10,000 个实例进行训练,并分别抽取 1,000 个实例进行验证和测试,每个数据集在两个类上保持平衡。 有关详细信息,请参阅我们的 笔记本.
训练基于 transformer 的有毒语言分类器
第一步是训练一个基于 transformer 的有毒语言分类器。 我们使用预训练的 DistilBERT 语言模型作为基础,并在 Jigsaw 恶意评论分类训练数据集上对模型进行微调。
符号化
标记是自然语言输入的构建块。 标记化是一种将一段文本分成标记的方法。 标记可以采用多种形式,可以是单词、字符或子词。 为了让模型理解输入文本,使用分词器为 NLP 模型准备输入。 标记化的一些示例包括将字符串拆分为子词标记字符串、将标记字符串转换为 ID 以及将新标记添加到词汇表中。
在下面的代码中,我们使用预训练的 DistilBERT 分词器来处理训练和测试数据集:
pretrained_model_name_or_path = "distilbert-base-uncased"
tokenizer = AutoTokenizer.from_pretrained(pretrained_model_name_or_path)

def preprocess_function(examples):
    result = tokenizer(
        examples["text"], padding="max_length", max_length=128, truncation=True
    )
    return result

train_dataset = train_dataset.map(
    preprocess_function, batched=True, load_from_cache_file=False, num_proc=num_proc
)

valid_dataset = valid_dataset.map(
    preprocess_function, batched=True, load_from_cache_file=False, num_proc=num_proc
)

test_dataset = test_dataset.map(
    preprocess_function, batched=True, load_from_cache_file=False, num_proc=num_proc
)
对于每个输入文本,DistilBERT 分词器输出四个特征:
- 文本 - 输入文本。
- 标签 – 输出标签。
- 输入ID – 词汇表中输入序列标记的索引。
- 注意掩码 – 掩码以避免对填充标记索引进行关注。 选择的掩码值为 [0, 1]:
现在我们有了标记化的数据集,下一步是训练二进制有毒语言分类器。
建模
第一步是加载基础模型,这是一个预训练的 DistilBERT 语言模型。 该模型加载了 Hugging Face Transformers 类 AutoModelForSequenceClassification:
base_model = AutoModelForSequenceClassification.from_pretrained(
    pretrained_model_name_or_path, num_labels=1
)
然后我们使用类自定义超参数 TrainingArguments. 该模型在 32 个 epoch 上以批量大小 10 进行训练,学习率为 5e-6,预热步骤为 500。训练后的模型保存在 model_dir,这是在笔记本的开头定义的。
training_args = TrainingArguments(
    output_dir=model_dir,
    num_train_epochs=10,
    per_device_train_batch_size=32,
    per_device_eval_batch_size=64,
    warmup_steps=500,
    evaluation_strategy="epoch",
    save_strategy="epoch",
    save_total_limit=5,
    logging_dir=os.path.join(model_dir, "logs"),
    learning_rate=5e-6,
    load_best_model_at_end=True,
    metric_for_best_model="loss",
    disable_tqdm=True,
)
为了在训练期间评估模型的性能,我们需要提供 Trainer 带有评价函数。 这里我们是报告准确性、F1 分数、平均精度和 AUC 分数。
# compute metrics function
def compute_metrics(pred):
    targets = 1 * (pred.label_ids >= 0.5)
    outputs = 1 * (pred.predictions >= 0.5)
    accuracy = metrics.accuracy_score(targets, outputs)
    f1_score_micro = metrics.f1_score(targets, outputs, average="micro")
    f1_score_macro = metrics.f1_score(targets, outputs, average="macro")
    f1_score_weighted = metrics.f1_score(targets, outputs, average="weighted")
    ap_score_micro = metrics.average_precision_score(
        targets, pred.predictions, average="micro"
    )
    ap_score_macro = metrics.average_precision_score(
        targets, pred.predictions, average="macro"
    )
    ap_score_weighted = metrics.average_precision_score(
        targets, pred.predictions, average="weighted"
    )
    auc_score_micro = metrics.roc_auc_score(targets, pred.predictions, average="micro")
    auc_score_macro = metrics.roc_auc_score(targets, pred.predictions, average="macro")
    auc_score_weighted = metrics.roc_auc_score(
        targets, pred.predictions, average="weighted"
    )
    return {
        "accuracy": accuracy,
        "f1_score_micro": f1_score_micro,
        "f1_score_macro": f1_score_macro,
        "f1_score_weighted": f1_score_weighted,
        "ap_score_micro": ap_score_micro,
        "ap_score_macro": ap_score_macro,
        "ap_score_weighted": ap_score_weighted,
        "auc_score_micro": auc_score_micro,
        "auc_score_macro": auc_score_macro,
        "auc_score_weighted": auc_score_weighted,
    }
Trainer 类为 PyTorch 中的功能完整训练提供了一个 API。 让我们实例化 Trainer 通过提供基础模型、训练参数、训练和评估数据集以及评估函数:
trainer = Trainer(
    model=base_model,
    args=training_args,
    train_dataset=train_dataset,
    eval_dataset=valid_dataset,
    compute_metrics=compute_metrics,
)
之后 Trainer 实例化后,我们就可以开始训练过程了:
train_result = trainer.train()
训练过程完成后,我们将分词器和模型工件保存在本地:
tokenizer.save_pretrained(model_dir)
trainer.save_model(model_dir)
评估模型的稳健性
在本节中,我们试图回答一个问题:我们的毒性过滤模型对基于文本的对抗性攻击的鲁棒性如何? 为了回答这个问题,我们从 TextAttack 库中选择了一个攻击配方,并用它来构建扰动的对抗样本来欺骗我们的目标毒性过滤模型。 每个攻击配方通过将种子文本输入转换为稍微改变的文本样本来生成文本对抗性示例,同时确保种子及其扰动文本遵循某些语言约束(例如,保留语义)。 如果这些新生成的示例将目标模型诱骗到错误的分类中,则攻击成功; 否则,该种子输入的攻击失败。
目标模型的对抗鲁棒性通过攻击成功率 (ASR) 指标进行评估。 ASR 被定义为成功攻击与所有攻击的比率。 ASR 越低,模型抵抗对抗性攻击的能力就越强。

首先,我们定义一个自定义模型包装器来将标记化和模型预测包装在一起。 此步骤还确保预测输出符合 TextAttack 库要求的输出格式。
class CustomModelWrapper(ModelWrapper):
    def __init__(self, model):
        self.model = model

    def __call__(self, text_input_list):
        device = self.model.device
        encoded_input = tokenizer(
            text_input_list,
            truncation=True,
            padding="max_length",
            max_length=128,
            return_tensors="pt",
        ).to(device)
        # print(encoded_input.device)

        with torch.no_grad():
            output = self.model(**encoded_input)
        logits = output.logits
        preds = torch.sigmoid(logits)
        preds = preds.squeeze(dim=-1)
        final_preds = torch.stack((1 - preds, preds), dim=1)
        return final_preds
现在我们加载经过训练的模型并使用经过训练的模型创建自定义模型包装器:
trained_model = AutoModelForSequenceClassification.from_pretrained(model_dir)
trained_model = trained_model.to("cuda:0")

model_wrapper = CustomModelWrapper(trained_model)
产生攻击
现在我们需要准备数据集作为攻击配方的种子。 这里我们只使用那些有毒的例子作为种子,因为在现实世界的场景中,社会工程师主要会尝试扰乱有毒的例子来欺骗目标过滤模型是良性的。 攻击可能需要时间才能产生; 出于本文的目的,我们随机抽取 1,000 个有毒训练样本进行攻击。
我们为测试和训练数据集生成对抗样本。 我们使用测试对抗样本进行鲁棒性评估,使用训练对抗样本进行对抗训练。
threshold = 0.5
sub_sample_to_attack = 1000
df_train_to_attack = df_train[df_train['labels']==1].sample(sub_sample_to_attack)

## We attack the toxic samples
## Goal is to perturbe toxic samples enough that the model classifies them as Non-toxic
test_dataset_to_attack = textattack.datasets.Dataset(
    [
        (x, 1)
        for x, y in zip(
            test_dataset["text"],
            test_dataset["labels"],
        )
        if y > threshold
    ]
)

train_dataset_to_attack = textattack.datasets.Dataset(
    [
        (x, 1)
        for x, y in zip(
            df_train_to_attack["text"],
            df_train_to_attack["labels"],
        )
        if y > threshold
    ]
)
然后我们定义生成攻击的函数:
def generate_attacks(
    recipe, model_wrapper, dataset_to_attack, num_examples=-1, parallel=False
):
    print(f"The Attack Recipe is: {recipe}")
    if recipe == "textfoolerjin2019":
        attack = TextFoolerJin2019.build(model_wrapper)
    elif recipe == "a2t_yoo_2021":
        attack = A2TYoo2021.build(model_wrapper)
    elif recipe == "Pruthi2019":
        attack = Pruthi2019.build(model_wrapper)
    elif recipe == "TextBuggerLi2018":
        attack = TextBuggerLi2018.build(model_wrapper)
    elif recipe == "DeepWordBugGao2018":
        attack = DeepWordBugGao2018.build(model_wrapper)

    attack_args = textattack.AttackArgs(
        num_examples=num_examples, parallel=parallel, num_workers_per_device=5
    )
    ## num_examples = -1 means the entire dataset
    attacker = Attacker(attack, dataset_to_attack, attack_args)
    attack_results = attacker.attack_dataset()
    return attack_results
选择攻击配方并生成攻击:
%%time
recipe = 'textfoolerjin2019'
test_attack_results = generate_attacks(recipe, model_wrapper, test_dataset_to_attack, num_examples=-1)
train_attack_results = generate_attacks(recipe, model_wrapper, train_dataset_to_attack, num_examples=-1)
将攻击结果记录到 Pandas 数据框中:
def log_attack_results(attack_results):
    exception_ids = []
    logger = CSVLogger(color_method="html")

    for i in range(len(attack_results)):
        try:
            result = attack_results[i]
            logger.log_attack_result(result)
        except:
            exception_ids.append(i)
    df_attacks = logger.df
    return df_attacks, exception_ids


df_attacks_test, test_exception_ids = log_attack_results(test_attack_results)
df_attacks_train, train_exception_ids = log_attack_results(train_attack_results)
攻击结果包含 original_text, perturbed_text, original_output及 perturbed_output。 当 perturbed_output 是相反的 original_output,攻击成功。

display(
    HTML(df_attacks_test[["original_text", "perturbed_text"]].head().to_html(escape=False))
)
红色文字代表攻击成功,绿色文字代表攻击失败。

通过ASR评估模型的稳健性
使用以下代码评估模型的稳健性:
ASR_test = (
    df_attacks_test.result_type.value_counts()["Successful"]
    / df_attacks_test.result_type.value_counts().sum()
)

ASR_train = (
    df_attacks_train.result_type.value_counts()["Successful"]
    / df_attacks_train.result_type.value_counts().sum()
)

print(f"The Attack Success Rate of the model toward test dataset is {ASR_test*100}%")

print(f"The Attack Success Rate of the model toward train dataset is {ASR_train*100}%")
这将返回以下内容:
The Attack Success Rate of the model toward test dataset is 52.400000000000006%
The Attack Success Rate of the model toward train dataset is 51.1%
准备成功的攻击
有了所有可用的攻击结果,我们从训练的对抗样本中获取成功的攻击,并使用它们重新训练模型:
# Supply the original labels to the successful attacks
# Here the original labels are all 1, there are also some datasets with fractional labels between 0-1

df_attacks_train = df_attacks_train[["perturbed_text", "result_type"]].copy()
df_attacks_train["labels"] = df_train_to_attack["labels"].reset_index(drop=True)

# Clean the text
df_attacks_train["text"] = df_attacks_train["perturbed_text"].replace(
    "|", "", regex=True
)
df_attacks_train["text"] = df_attacks_train["text"].replace("", "n", regex=True)

# Prepare data to add to the training dataset
df_succ_attacks_train = df_attacks_train.loc[
    df_attacks_train.result_type == "Successful", ["text", "labels"]
]
df_succ_attacks_train.shape, df_succ_attacks_train.head(2)

对抗训练
在本节中,我们将来自训练数据的成功对抗攻击与原始训练数据相结合,然后在这个组合数据集上训练一个新模型。 该模型称为对抗训练模型。
# New Train: Original Train + Successful Attacks on Original Train

df_train_attacked = pd.concat([df_train, df_succ_attacks_train], ignore_index=True)
data_train_attacked = Dataset.from_pandas(df_train_attacked)
data_train_attacked = data_train_attacked.map(
    preprocess_function, batched=True, load_from_cache_file=False, num_proc=num_proc
)

training_args_AT = TrainingArguments(
    output_dir=model_dir_AT,
    num_train_epochs=10,
    per_device_train_batch_size=32,
    per_device_eval_batch_size=64,
    warmup_steps=500,
    evaluation_strategy="epoch",
    save_strategy="epoch",
    save_total_limit=5,
    logging_dir=os.path.join(model_dir, "logs"),
    learning_rate=5e-6,
    load_best_model_at_end=True,
    metric_for_best_model="loss",
    disable_tqdm=True,
)

trainer_AT = Trainer(
    model=base_model,
    args=training_args_AT,
    train_dataset=data_train_attacked,
    eval_dataset=valid_dataset,
    compute_metrics=compute_metrics
)

trainer_AT.train()
将对抗训练模型保存到本地目录 model_dir_AT:
tokenizer.save_pretrained(model_dir_AT)
trainer_AT.save_model(model_dir_AT)
评估对抗训练模型的稳健性
现在模型经过了对抗训练,我们想看看模型的鲁棒性是如何相应变化的:
trained_model_AT = AutoModelForSequenceClassification.from_pretrained(model_dir_AT)
trained_model_AT = trained_model_AT.to("cuda:0")
trained_model_AT.device

model_wrapper_AT = CustomModelWrapper(trained_model_AT)
test_attack_results_AT = generate_attacks(recipe, model_wrapper_AT, test_dataset_to_attack, num_examples=-1)
df_attacks_AT_test, AT_test_exception_ids = log_attack_results(test_attack_results_AT)

ASR_AT_test = (
    df_attacks_AT_test.result_type.value_counts()["Successful"]
    / df_attacks_AT_test.result_type.value_counts().sum()
)

print(f"The Attack Success Rate of the model is {ASR_AT_test*100}%")
上述代码返回以下结果:
The Attack Success Rate of the model is 19.8%
比较原始模型和对抗训练模型的鲁棒性:
print(
    f"The ASR of the Adversarial Trained model has a {(ASR_test - ASR_AT_test)/ASR_test*100}% decrease compare with the original model. This proves that the Adversarial Training improves the model's robustness against the attacks."
)
这将返回以下内容:
The ASR of the Adversarial Trained model has a 62.213740458015266% decrease
compare with the original model. This proves that the Adversarial Training
improves the model's robustness against the attacks.
到目前为止,我们已经训练了一个基于 DistilBERT 的二进制毒性语言分类器,测试了它对对抗性文本攻击的鲁棒性,进行了对抗性训练以获得新的毒性语言分类器,并测试了新模型对对抗性文本攻击的鲁棒性。
我们观察到经过对抗训练的模型具有较低的 ASR,使用原始模型 ASR 作为基准降低了 62.21%。 这表明该模型对某些对抗性攻击更加稳健。
模型性能评估
除了模型的稳健性,我们还有兴趣了解模型在经过对抗训练后如何对干净样本进行预测。 在下面的代码中,我们使用批量预测模式来加速评估过程:
def batch_predict(model_wrapper, text_list, batch_size=64):
    """This function performs batch prediction for given model nad text list"""
    predictions = []
    for i in tqdm(range(0, len(text_list), batch_size)):
       batch = text_list[i : i + batch_size]
       model_predictions = model_wrapper(batch)[:, 1]
       model_predictions = model_predictions.cpu().numpy()
       predictions.append(model_predictions)
       predictions = np.concatenate(predictions, axis=0)
    return predictions
评估原始模型
我们使用以下代码来评估原始模型:
test_text_list = df_test.text.to_list()

model_predictions = batch_predict(model_wrapper, test_text_list, batch_size=64)

y_true_prob = np.array(df_test["labels"])
y_true = [0 if x < 0.5 else 1 for x in y_true_prob]

threshold = 0.5
y_pred_prob = model_predictions.flatten()
y_pred = [0 if x < threshold else 1 for x in y_pred_prob]

fig, ax = plt.subplots(figsize=(10, 10))
conf_matrix = confusion_matrix(y_true, y_pred)
ConfusionMatrixDisplay(conf_matrix).plot(ax=ax)
print(classification_report(y_true, y_pred))
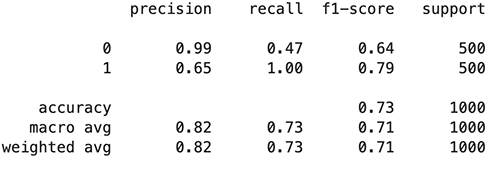
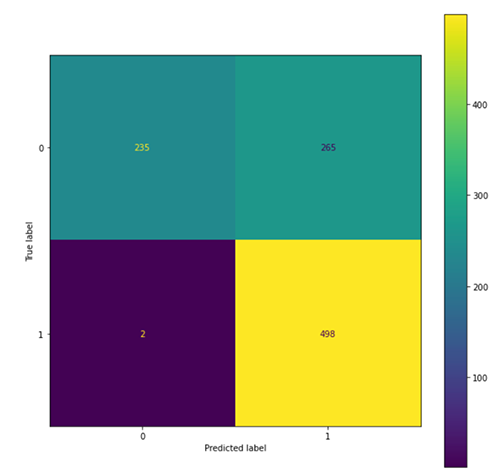
下图总结了我们的发现。
评估对抗性训练模型
使用以下代码评估对抗训练模型:
model_predictions_AT = batch_predict(model_wrapper_AT, test_text_list, batch_size=64)

y_pred_prob_AT = model_predictions_AT.flatten()
y_pred_AT = [0 if x < threshold else 1 for x in y_pred_prob_AT]

fig, ax = plt.subplots(figsize=(10, 10))
conf_matrix = confusion_matrix(y_true, y_pred_AT)
ConfusionMatrixDisplay(conf_matrix).plot(ax=ax)
print(classification_report(y_true, y_pred_AT))
下图总结了我们的发现。

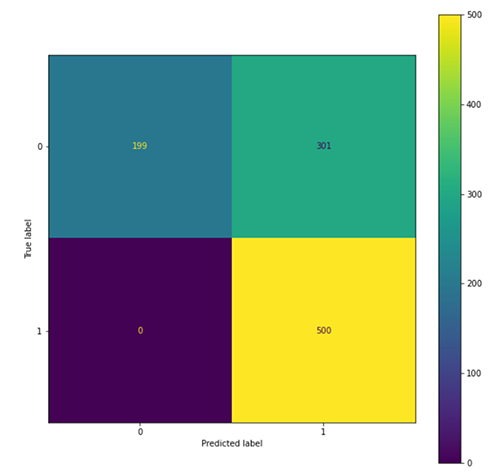
我们观察到,与原始模型(801 个预测为 1)相比,经过对抗训练的模型倾向于将更多示例预测为有毒(763 个预测为 1),这导致对有毒类的召回率和无毒类的准确率增加类,以及有毒类的准确率下降和无毒类的召回率。 这可能是因为在对抗训练过程中看到了更多的有毒类别。
总结
作为内容审核的一部分,毒性语言分类器用于过滤有毒内容并创建更健康的在线环境。 毒性过滤模型的实际部署不仅需要高预测性能,还需要对社会工程(如对抗性攻击)具有鲁棒性。 这篇文章提供了从训练毒性语言分类器到通过对抗训练提高其鲁棒性的分步过程。 我们表明,对抗性训练可以帮助模型在保持高模型性能的同时变得更加强大以抵抗攻击。 有关这个新兴主题的更多信息,我们鼓励您自行探索和测试我们的脚本。 您可以从以下位置访问这篇文章中的笔记本 AWS 示例 GitHub 存储库.
Hugging Face 和 AWS 在 2022 年初宣布建立合作伙伴关系,这使得在 SageMaker 上训练 Hugging Face 模型变得更加容易。 此功能可通过开发 拥抱脸 AWS DLC. 这些容器包括 Hugging Face Transformers、Tokenizers 和 Datasets 库,它们允许我们将这些资源用于训练和推理工作。 有关可用 DLC 图像的列表,请参阅 可用的深度学习容器镜像. 它们得到维护并定期更新安全补丁。
您可以在以下内容中找到许多有关如何使用这些 DLC 训练 Hugging Face 模型的示例 GitHub回购.
AWS 提供预训练的 AWS AI 服务,无需 ML 经验即可使用 API 调用将其集成到应用程序中。 例如, 亚马逊领悟 可以执行 NLP 任务,例如自定义实体识别、情感分析、关键短语提取、主题建模等,以从文本中收集见解。 由于其各种功能,它可以对多种语言进行文本分析。
参考资料
作者简介
 易翔 是亚马逊机器学习解决方案实验室的二级数据科学家,她帮助不同行业的 AWS 客户加速人工智能和云的采用。
 严俊奇 是亚马逊机器学习解决方案实验室的首席应用科学家。 她创新并应用机器学习来帮助 AWS 客户加快 AI 和云的采用。


 易翔 是亚马逊机器学习解决方案实验室的二级数据科学家,她帮助不同行业的 AWS 客户加速人工智能和云的采用。
 严俊奇 是亚马逊机器学习解决方案实验室的首席应用科学家。 她创新并应用机器学习来帮助 AWS 客户加快 AI 和云的采用。


